In summary:
- Master defensive positioning at junctions to eliminate the primary danger of left-hook collisions.
- Adopt a layered security strategy with two different, high-quality locks to deter thieves in city centres.
- Use specialised navigation apps to find quieter routes and proactively reduce your exposure to traffic.
- Ensure your e-bike is legally compliant (250W motor, 15.5mph assist limit) to avoid fines and insurance issues.
- Focus on biomotion visibility with lights on moving parts to be seen effectively at twilight, not just bright.
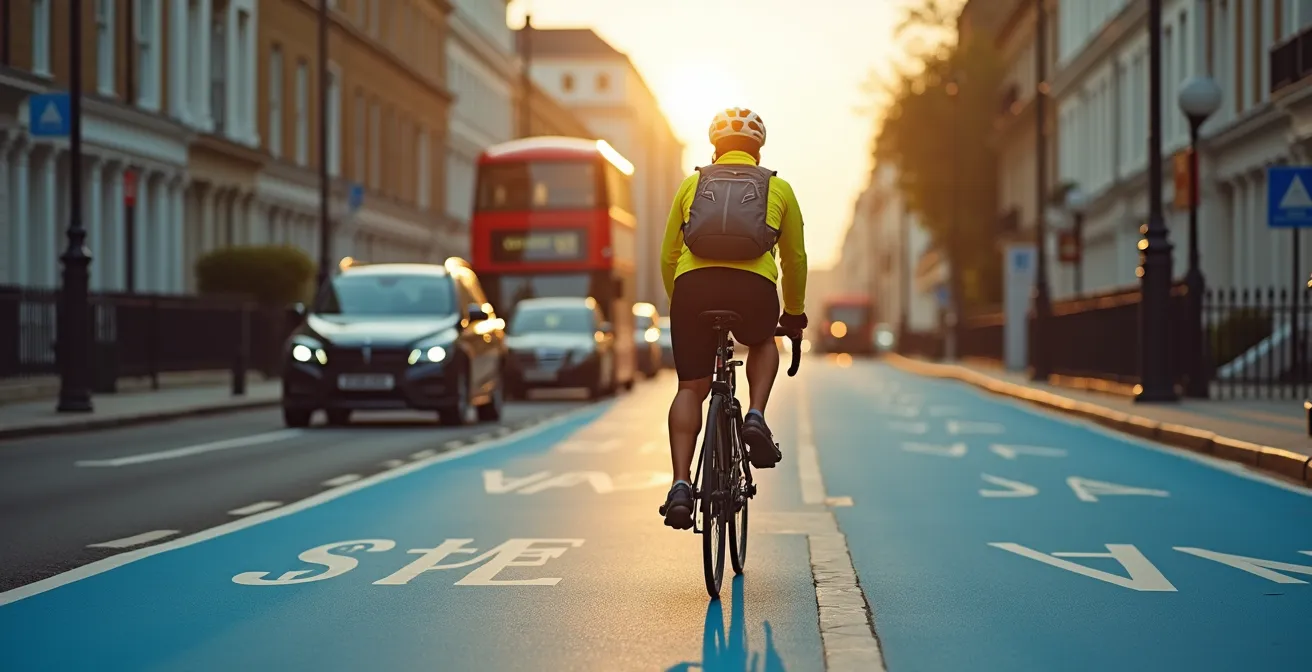
You see the bright blue paint of the Cycle Superhighway and think, “This is for me. This is safe.” But within minutes, the reality of a London rush hour hits. The sheer volume of traffic, the intimidating presence of HGVs, and the aggressive manoeuvres of other road users can make even dedicated infrastructure feel like a gauntlet. Many new cyclists are told to simply “be visible” or “follow the rules,” but this advice falls short when you’re already doing that and still feel vulnerable.
The truth is, passive safety is not enough. The blue paint is a guide, not a forcefield. To truly commute with confidence, you need to shift your mindset from a passive road user to an active, defensive operator. This isn’t about being aggressive; it’s about being strategic, anticipating threats before they materialise, and controlling your own space and security with practiced intent. It’s about understanding the specific dangers of the urban environment and having a pre-planned response for each one.
This guide moves beyond the basics. We will break down the core pillars of defensive urban cycling, from mastering your position at dangerous junctions to making your bike an unattractive target for thieves. We will explore how technology can help you find safer routes and ensure your equipment is not only effective but legal. By the end, you will have a clear, actionable framework to not just survive, but master your commute on London’s cycle lanes.
To navigate this complex environment, it’s essential to understand the specific strategies that address each type of risk you’ll encounter. The following sections break down these key areas, providing practical, expert-led advice to build your confidence and competence on the road.
Summary: Your Guide to a Safer London Cycle Commute
- The Left-Hook Danger: How to Position Yourself at Traffic Lights?
- GoPro or Techalogic: Do You Need a Camera for Insurance Evidence?
- D-Lock or Chain: What Actually Stops Thieves in City Centres?
- Komoot or Google Maps: Which App Finds the Quietest Cycle Paths?
- Throttle or Pedal Assist: What Makes Your E-Bike Illegal in the UK?
- The Visibility Error That Cyclists Make on Country Lanes at Twilight
- Lights and Locks: Can You Add Safety Gear to Your Voucher?
- How to Maintain Outdoor Fitness Routines During the Wet British Winter?
The Left-Hook Danger: How to Position Yourself at Traffic Lights?
The single most dangerous situation for a London cyclist is the junction. It’s not an opinion; data confirms it. According to the London Cycling Campaign’s 2024 dangerous junctions map, the vast majority of serious and fatal collisions occur at these intersections. The most notorious threat is the “left-hook,” where a vehicle, particularly an HGV with significant blind spots, turns left across your path as you proceed straight ahead.
Your survival here depends entirely on defensive positioning. You must assume a driver might not see you and place yourself where you are most conspicuous. When you approach a junction, your goal is to be seen and to prevent any vehicle from trying to squeeze past you on the left. This means taking the ‘primary position’—riding in the centre of the lane. This action clearly signals your intention to go straight and makes it physically impossible for a car to hook you.
At a red light, always move into the Advanced Stop Line (ASL) box if one is available. This is your safe zone, putting you ahead of the traffic and directly in the sightline of the front-most vehicles. If you’re next to a large vehicle, never linger in its blind spot alongside the cab. Position yourself either well ahead of it or hang back behind it. Before the light turns green, make positive eye contact with drivers through their windscreen and mirrors. A simple nod can confirm they’ve seen you. Clear and early signalling is the final piece of this defensive puzzle, communicating your intent to everyone around you.
GoPro or Techalogic: Do You Need a Camera for Insurance Evidence?
In the unfortunate event of a collision or a dangerous incident, the situation can quickly devolve into a ‘he said, she said’ dispute. An onboard camera acts as your impartial, non-negotiable witness. For new cyclists feeling intimidated, having a record of events can be a powerful tool, not just for insurance claims but also for reporting dangerous driving to the police via portals like the Met’s Roadsafe London system.
However, the value of the footage depends entirely on its quality. While the police encourage submissions, anecdotal evidence suggests that clear, unambiguous footage is more likely to be acted upon. This is where the choice of camera becomes important. Brands like GoPro are known for high-resolution video, while companies like Techalogic offer dual-lens cameras that record both front and rear views simultaneously, which is invaluable for capturing close passes from behind.
This image highlights a typical helmet-mounted setup, which offers a key advantage: the camera points where you look. This is crucial for capturing the face of a driver or the number plate of a vehicle involved in an incident.
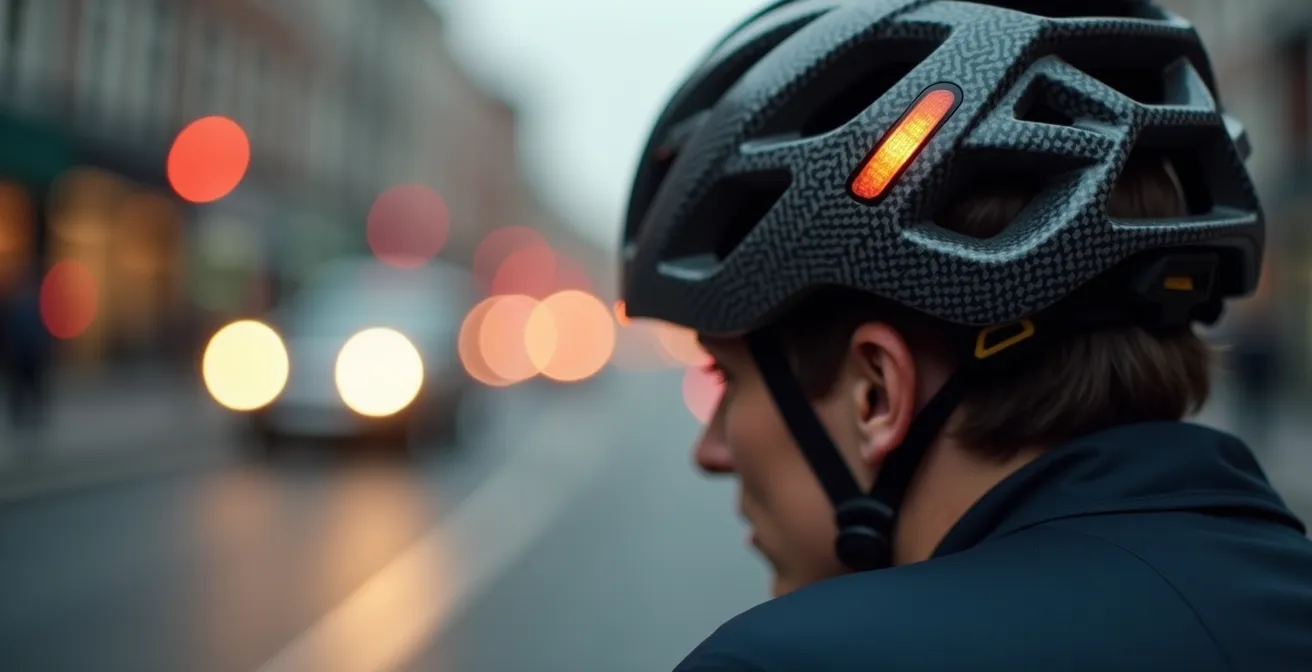
Ultimately, the decision to use a camera is a personal one, weighing cost against peace of mind. But if you do invest, prioritise video quality, battery life, and a mounting position that captures the most relevant information. It’s a key part of the modern urban cyclist’s toolkit for accountability, turning a moment of fear and uncertainty into a clear, factual record.
D-Lock or Chain: What Actually Stops Thieves in City Centres?
Your journey doesn’t end when you dismount; it only transitions to the next phase of security. Bike theft in London is rampant, and certain areas are high-risk. For instance, Metropolitan Police data reveals Hackney had 1,363 bike thefts in a recent one-year period, making it a top hotspot. To counter this, you must think like a thief and employ a strategy of security layering.
No single lock is invincible. A professional thief with the right tools can defeat any lock given enough time. Your goal is to make your bike so inconvenient and time-consuming to steal that they move on to an easier target. The first layer is using high-quality locks. Look for products with a Sold Secure Gold or Diamond rating. These have been independently tested against a variety of attack methods. The key is to use two different types of locks—for example, a D-lock and a heavy-duty chain. This forces a thief to carry two different types of tools, dramatically increasing the difficulty.
The second layer is technique. Always lock your frame and both wheels to an immovable object, like a Sheffield stand. Before you lock up, quickly inspect the stand for any cuts that might be covered by stickers—a common trick. The third layer is registration. Services like BikeRegister are endorsed by the Metropolitan Police and create a national database. Marking your bike and adding a visible sticker acts as a powerful deterrent, as it makes the bike harder to sell on and easier for police to recover. Remember that a significant percentage of thefts occur in semi-private areas like courtyards or sheds, so maintain this vigilance even when you think your bike is out of public view.
Komoot or Google Maps: Which App Finds the Quietest Cycle Paths?
One of the most effective defensive strategies is proactive: avoiding danger in the first place. While Cycle Superhighways are the main arteries, London is crisscrossed with a network of “Quietways”—less-trafficked backstreets and park paths designed for a more relaxed ride. Your navigation app is the key to unlocking this calmer network, but not all apps are created equal.
While Google Maps is ubiquitous, its cycling directions often prioritise the most direct route, which can lead you down busy roads. For a cyclist feeling intimidated, this is counterproductive. Specialised apps offer far more nuanced routing options that cater to safety and comfort over pure speed. Understanding their strengths and weaknesses is crucial for planning a less stressful commute.
The following table, based on information from sources like TfL, compares some of the most popular options for London cyclists:
| App | Cycleway Coverage | Real-time Updates | Quiet Route Options |
|---|---|---|---|
| TfL Journey Planner | All official Cycleways | Yes – TfL network | Quietway specific routing |
| Google Maps | Most major routes | Traffic-based | Limited quiet options |
| Komoot | Community updated | No | User-rated quiet paths |
| CycleStreets | Comprehensive | No | Three route types including ‘Quiet’ |
As the table shows, apps like CycleStreets and the official TfL Journey Planner are specifically designed to find quiet routes. Komoot offers a social layer, with routes and highlights recommended by other cyclists. Experimenting with these apps can transform your commute, replacing traffic-heavy roads with pleasant backstreets you never knew existed. Taking an extra five or ten minutes for your journey is a small price to pay for a massive reduction in stress and risk.
Throttle or Pedal Assist: What Makes Your E-Bike Illegal in the UK?
Electric bikes are a fantastic tool for London commuters, flattening hills and reducing sweat. However, there is a critical legal line between a compliant e-bike (known as an ‘Electrically Assisted Pedal Cycle’ or EAPC) and an illegal electric motorcycle. Crossing this line, often unknowingly, can lead to fines, points on your driving licence, and invalid insurance. As an instructor, I see this confusion frequently.
The law is very specific. The UK Road Traffic Act specifies that for an e-bike to be legal without a licence or insurance, it must meet strict criteria. The motor must have a maximum continuous power output of 250 watts, and the electrical assistance must cut out when the bike reaches 15.5 mph (25 km/h). Crucially, the assistance should only engage when the rider is pedalling. A bike with a “twist-and-go” throttle that can propel it from a standstill without pedalling is generally illegal unless it has undergone a separate, more complex type-approval process.
Many cheap, unregulated e-bikes and conversion kits available online do not meet these standards. They may have overpowered motors or throttles that allow for speeds well above the legal limit. Riding one of these is legally equivalent to riding an uninsured moped. Before you buy or ride an e-bike, it’s vital to perform a compliance check.
Your E-Bike Compliance Checklist
- Motor Cut-Out: Verify that the electric assistance stops completely when you reach 15.5 mph.
- Power Rating: Check the motor’s specifications to ensure it does not exceed 250W of continuous rated power.
- Pedal-Assist Only: Confirm that the bike requires you to pedal for the motor to engage (a throttle that assists only when you’re already pedalling is usually fine).
- CE Marking: Look for a plate or sticker with the manufacturer’s details and a CE mark, indicating it complies with EU/UK standards.
- Rider Age: Remember that you must be 14 years or older to legally ride an EAPC on public roads in the UK.
While a helmet, licence, and insurance are not legally required for a compliant EAPC, a helmet is always strongly recommended for your personal safety.
The Visibility Error That Cyclists Make on Country Lanes at Twilight
While the title mentions country lanes, the principle applies with even greater force in the visually chaotic environment of London at dusk. The most common visibility error is thinking that “being bright” is the same as “being seen.” A single, powerful light can easily be lost in the sea of car headlights, traffic signals, and storefronts. The key to being recognised as a cyclist is not just brightness, but biomotion.
Biomotion is the brain’s incredible ability to recognise the pattern of a moving human form, even with minimal information. This is why a cyclist with small, flashing lights on their ankles and pedals is often more conspicuous than one with a single, ultra-bright jacket. The up-and-down, circular motion of your feet and legs is an unmistakable biological signal that cuts through the visual noise. On crowded routes like the Cycle Superhighways, where TfL has recorded a 55% increase in cyclist numbers on Blackfriars Bridge alone, standing out from the crowd of other bike lights is essential.
Your visibility strategy should be layered. A powerful front light (minimum 400 lumens) on a flashing mode makes you noticeable, but it doesn’t define your shape. Your rear light should be bright and positioned at a driver’s eye level, on your seatpost or backpack. But the game-changer is adding lights to your moving parts. Small, clip-on lights for your ankles, reflective pedal straps, or even lights built into your pedals create that crucial biomotion signature. Spoke reflectors add vital lateral visibility for when you are crossing junctions—the most dangerous part of your ride. Even in daylight, a daylight-visible rear light is a smart precaution.
Lights and Locks: Can You Add Safety Gear to Your Voucher?
Investing in all this essential safety and security gear—Gold-rated locks, high-lumen lights, a quality helmet, a camera—can add up quickly. For many commuters, this initial outlay can be a significant barrier. This is where the UK’s Cycle to Work scheme becomes an invaluable resource, allowing you to get this equipment in a highly cost-effective way.
The scheme is a government tax incentive to encourage cycling to work. In essence, your employer buys the bike and safety equipment for you, and you “hire” it from them through salary sacrifice. Because the payments are taken from your pre-tax salary, you save on Income Tax and National Insurance, which typically amounts to a saving of 32-42% on the total cost. And yes, this absolutely includes safety equipment. You do not have to buy a bike to use the scheme; you can get a voucher purely for accessories.
To illustrate the potential savings, consider these typical commuter packages. The tax saving is an estimate for someone in the 40% tax bracket.
| Package | Items Included | Typical Cost | Tax Saving (40% rate) |
|---|---|---|---|
| Essential | Helmet, basic lights, cable lock | £150 | £60 |
| Standard | Helmet, 400+ lumen lights, D-lock, hi-vis jacket | £350 | £140 |
| Premium | MIPS helmet, camera, Gold rated lock, full visibility kit | £600 | £240 |
Schemes like Cyclescheme and the Green Commute Initiative facilitate this process. While some have a £1,000 cap, others have no limit, making it possible to get a high-quality e-bike and a full suite of premium safety gear. This programme makes best-in-class safety accessible and affordable, removing the financial barrier to a safer commute.
Key Takeaways
- Defensive positioning at junctions, especially taking the primary position, is the most critical skill to prevent common collisions.
- Effective bike security is a layered system: use two different Sold Secure Gold rated locks, a proper locking technique, and register your bike to deter thieves.
- Proactively plan safer journeys using specialised apps like CycleStreets or the TfL Planner to find and use London’s Quietway network.
How to Maintain Outdoor Fitness Routines During the Wet British Winter?
Committing to a cycle commute is a year-round endeavour, and the wet, gritty reality of a British winter is the ultimate test of that commitment. Maintaining your routine isn’t just about personal resilience; it’s about meticulous equipment maintenance. Winter conditions actively work to destroy your bike: water seeps into bearings, road grit grinds away at your drivetrain, and brakes wear out at an alarming rate.
A proactive winter maintenance routine is a safety issue. A snapped chain or failed brake on a wet, dark commute can be disastrous. Your first priority is your drivetrain. You must clean and lubricate your chain far more frequently, at least once a week, using a specific wet-weather lubricant. This is thicker and more resilient, preventing water and grit from causing premature wear. Secondly, check your brake pads weekly. Rim brake pads wear down incredibly fast in the wet, and disc brake pads are not immune. Don’t wait until you hear the grinding sound of metal on metal.
Personal comfort is also key to consistency. Full-length mudguards are non-negotiable; they protect you and your bike’s components from the constant spray of grimy water. Lowering your tyre pressure by 5-10 PSI will increase the size of the contact patch, providing much-needed extra grip on slick surfaces. Finally, plan for being wet. Have a drying station at home and, if possible, at work. Pack a spare pair of dry gloves and socks in a waterproof bag—changing into them for the ride home can make all the difference. Pre-planning alternative routes to avoid paths covered in slippery fallen leaves is another smart winter tactic.
Start by implementing these defensive strategies on your very next ride. By actively managing your space, security, and equipment, you can transform your commute from a source of anxiety into an empowering and enjoyable part of your day. Take control and reclaim your confidence on the road.
Frequently Asked Questions About Cycle Commuting in London
Can I include safety equipment in my Cycle to Work voucher?
Yes, both Cyclescheme and Green Commute Initiative allow safety equipment including helmets, locks, lights, and reflective clothing as part of the package.
What is the maximum value I can claim?
Standard schemes cap at £1,000, but Green Commute Initiative has no upper limit, allowing for e-bikes and comprehensive safety gear packages.
What happens at the end of the hire period?
You can purchase the equipment at Fair Market Value – typically 7% after 12 months or 3% after 5 years with an extended agreement.